The component-based checkout supports embedding PayKKa's checkout payment component into your checkout page to collect consumer payment information and supports multiple payment method combinations.
You can create your own checkout flow through the PayKKa Checkout UI component. The payment information entered by consumers is only transmitted within the component, which can reduce your PCI-DSS compliance costs.
To integrate Component/Drop-in, you need to provide your domain name to remove cross-origin restrictions
- Visa
- MasterCard
- JCB
- American Express
- Discover
- Diners Club
- Apple Pay
- Google Pay
- WechatPay
- Alipay+
- GCash
- Maya (Paymaya)
- ShopeePay
- GrabPay
- Zalopay
- VietQR
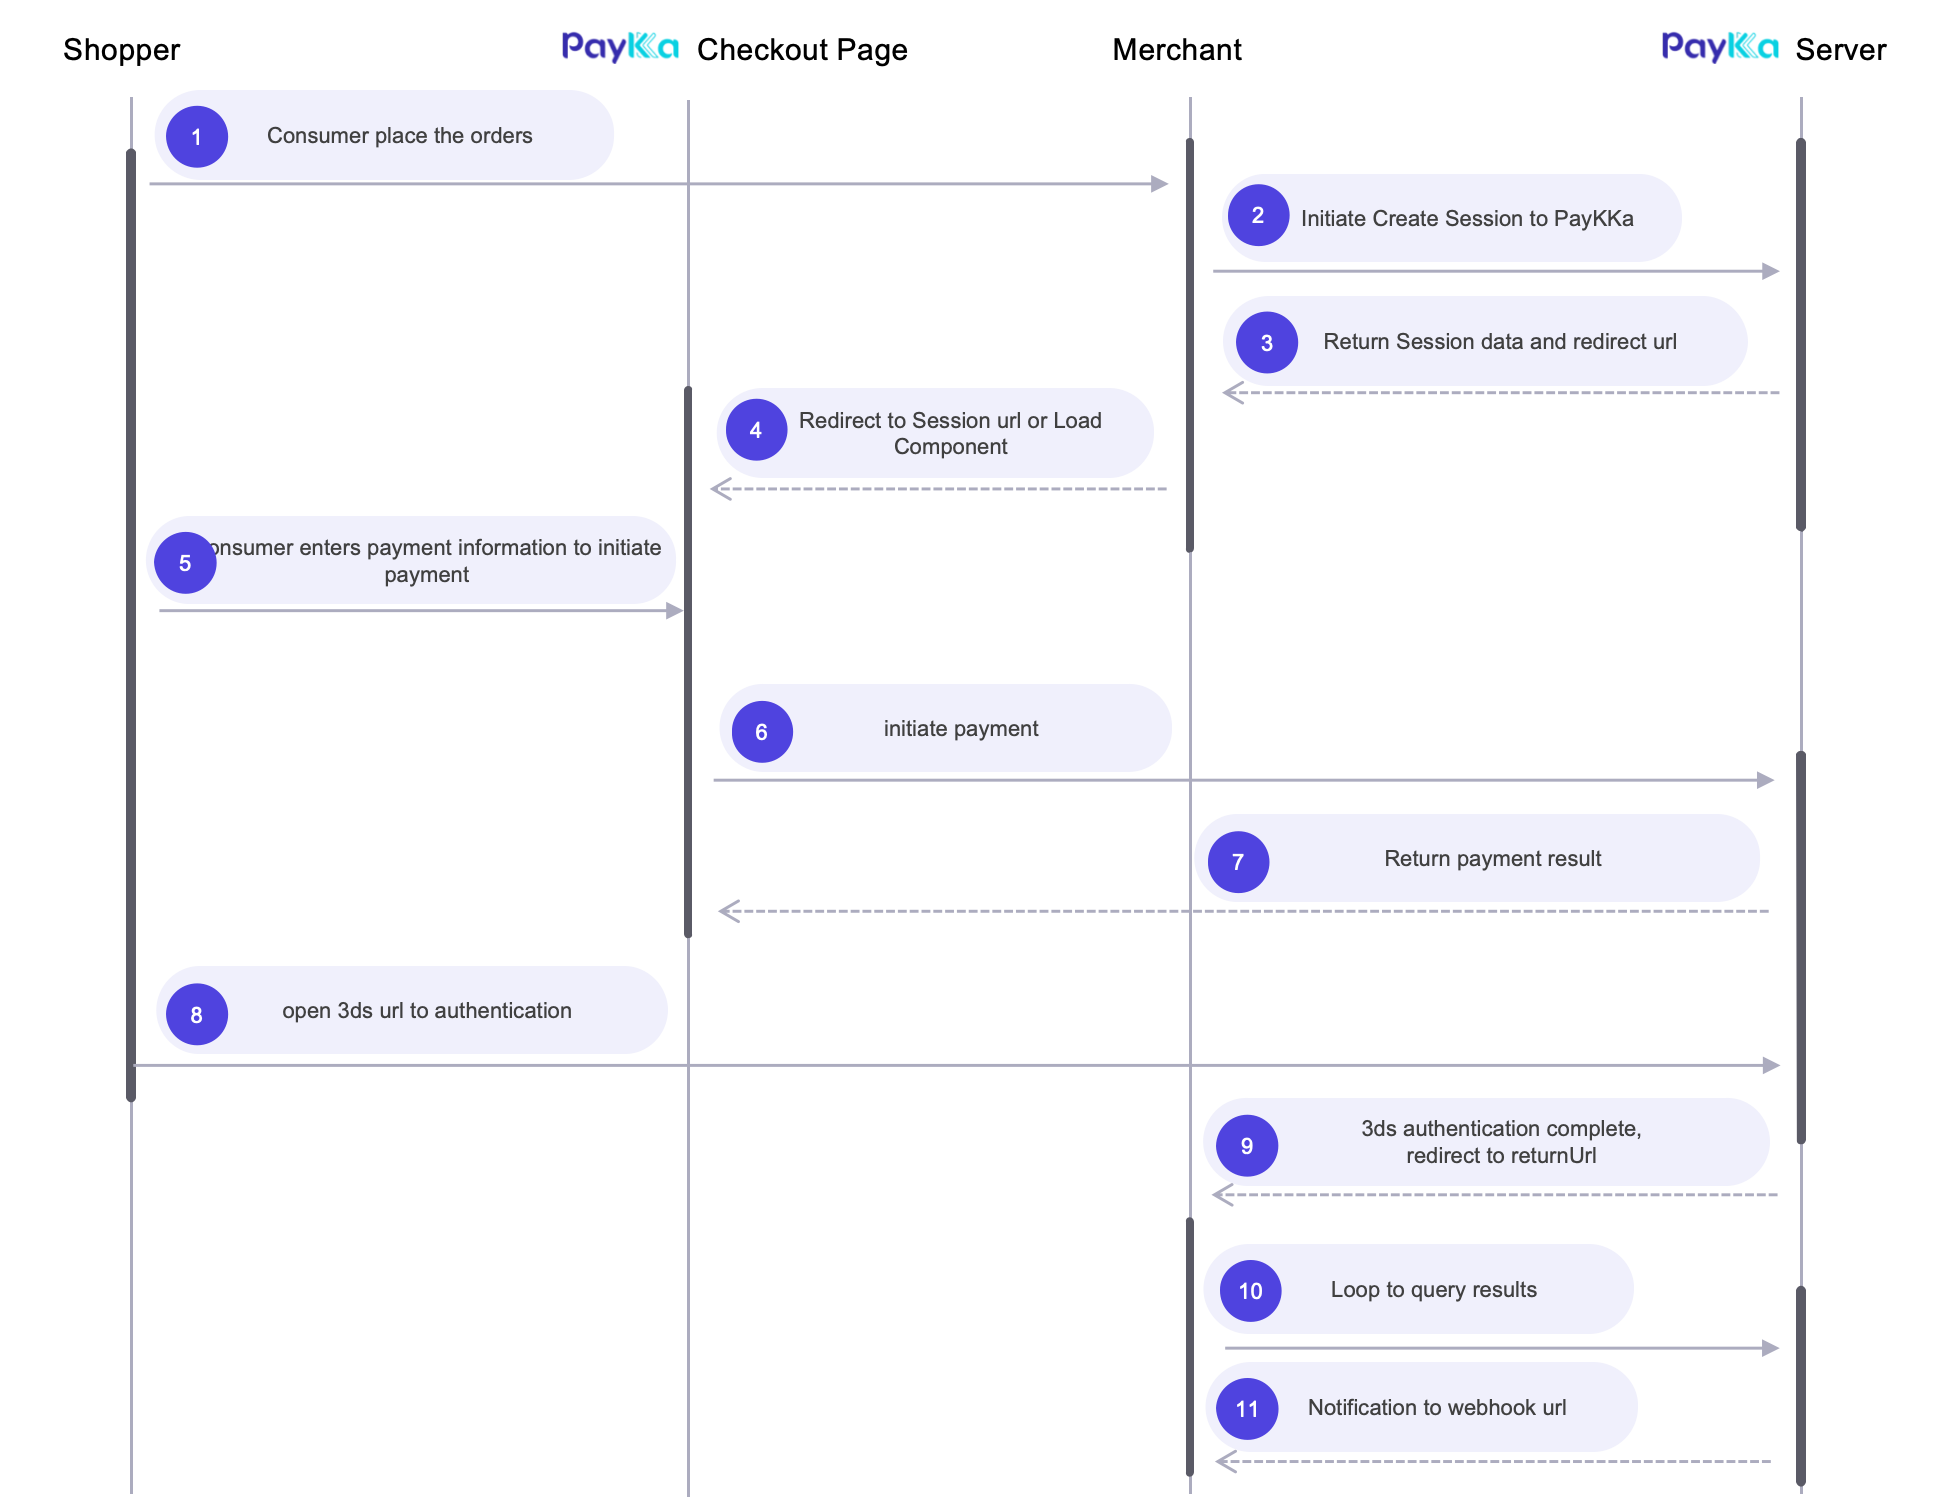
- Customers visit your checkout page, enter customer shipping and billing information, and click the payment button
- You initiate a payment request from the server to create a checkout, and you will receive the checkout ID(session_id) for loading the checkout page later
- You use the checkout ID(
session_id) and Client key(client_key) to load the embedded checkout page within the current page - The embedded checkout page will dynamically display supported payment methods. After the customer selects a payment method, click the payment button
- After submitting the payment, we will process all possible additional operations, such as 3DS authentication or third-party redirect pages
- After the payment is processed, the component callback function will be triggered, and you can handle the payment result here (the component callback function supports multiple callback events, it is recommended to at least integrate onSuccess, onExpired, onError events)
- Your webhook address will receive the payment result notification (it is recommended that you integrate transaction query to get the payment result)
- Get your transaction key
- Get your
Client key - Prepare your notification webhook address, provide it in the request parameters or set in the background, and notifications will be sent to the merchant at key payment nodes
- Prepare your redirect address, provide it in the request parameters, and it will redirect after checkout payment is completed
- Initiate the request: Create Session interface to create checkout, return checkout page URL
- For frontend component integration method, see PayKKa Checkout UI Component
- Merchants can integrate the Query Session interface to get checkout results, or directly integrate the Query Transaction interface to get order results (if there is no final result, it means the consumer did not initiate a transaction)
PayKKa's checkout (identifier: session_id) represents a payment intention in page form, and the final payment result is determined by the transaction (identifier: order_id) result. Therefore, you need to focus on the final status of the order to determine the payment result.
Checkout Query: Used to query the status and payment result of the checkout. If the consumer has not initiated payment, no transaction order will be generated.
Transaction Query: Used to query the payment result of the transaction order. After the order reaches its final state, it will be notified through webhook.
ApplePay component default style

GooglePay component default style

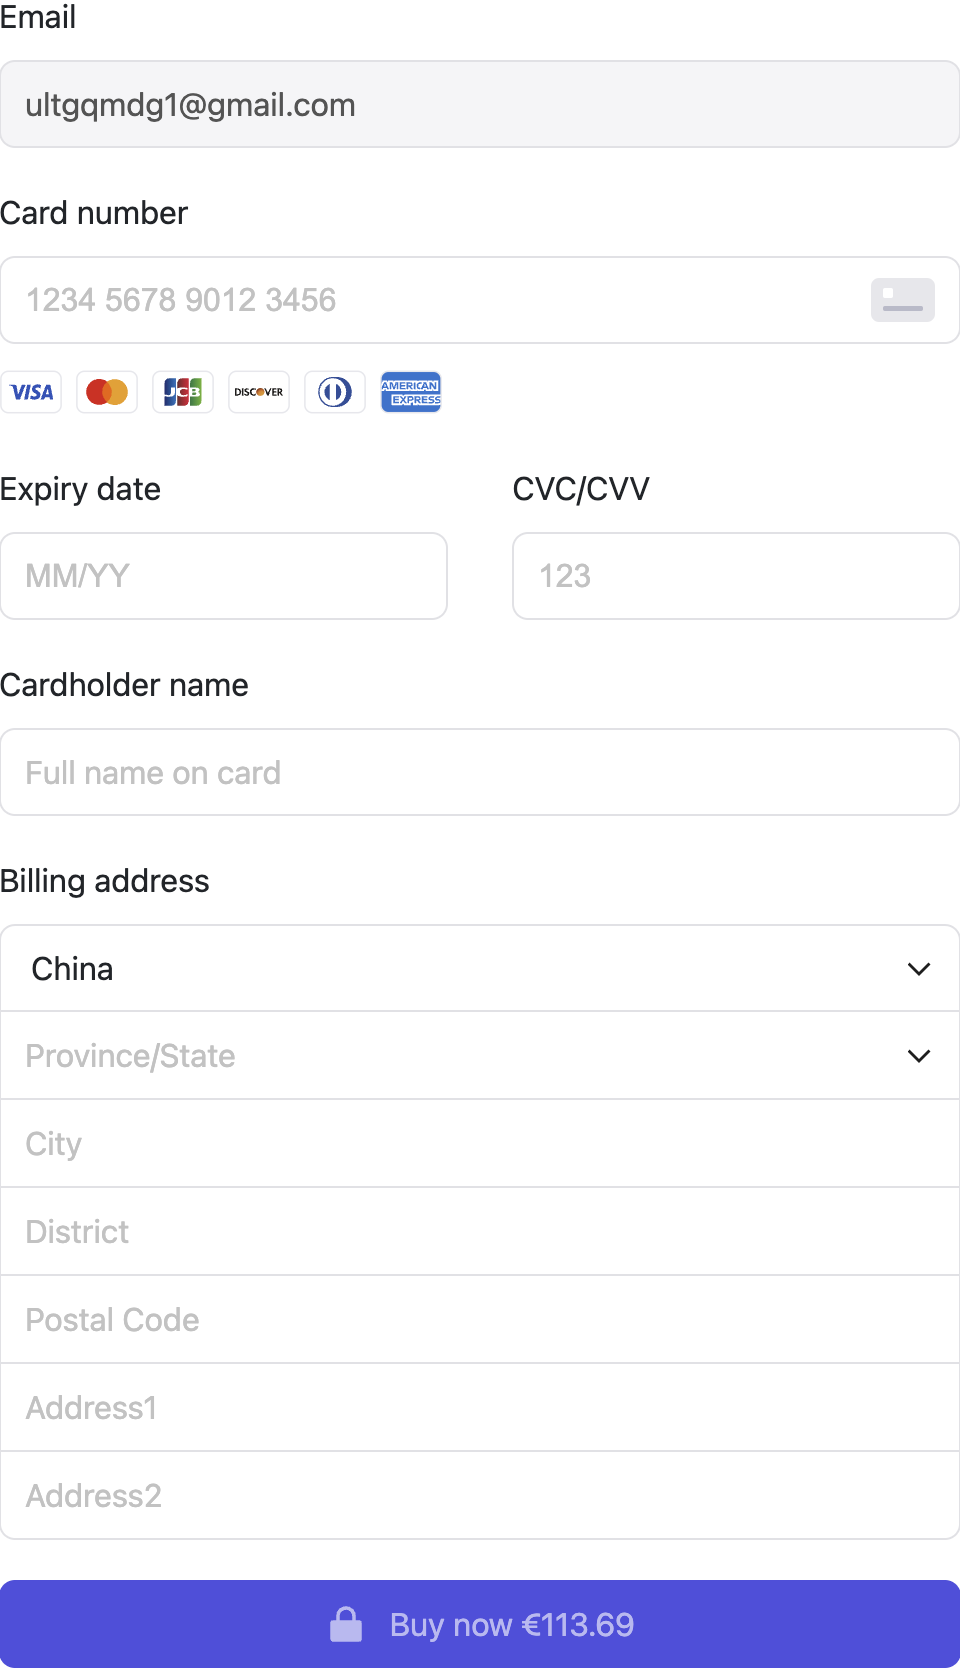
Card component default style
When the customer is ready to pay, send a server-side request to create a Session and corresponding link, and initiate a payment request through the Session
Request Example Create Session
{
  "merchant_id": "18356675194960",
  "payment_type": "PURCHASE",
  "authorisation_type": "FINAL_AUTH",
  "capture_method": "AUTOMATIC",
  "trans_id": "m3246749195217",
  "expire_time": "2025-05-05T17:17:24+08:00",
  "session_mode": "DROP_IN",  # Checkout mode, HOSTED: hosted, DROP_IN: embedded, COMPONENT: component
  "display_locale": "fr-FR",
  "currency": "HKD",
  "amount": "800",
  "return_url": "https://url",
  "payment": {
    "store_payment_method": true,  # Whether to store card information and tokenize, will get token; true: store, false: do not store
    "token_usage": "CARD_ON_FILE"
    "shopper_reference": "854f5baaf0a735139c583c4cea14d14c"
  },
  "goods": [
    // Product information
  ],
  "bill": {
    // Billing information
  },
  "shipping": {
    // Shipping information, required for physical goods
  },
  "customer": {
    // Consumer/customer information
  }
}
Response Example
{
    "ret_code": "000000",
    "ret_msg": "Success",
    "data": {
        "merchant_id": "18356675194960",
        "trans_id": "m3246749195217",
        "session_id": "CS208760010022288125",
        "session_mode": "DROP_IN",
        "status": "PROCESSING",
        "currency": "HKD",
        "amount": "800",
        "expire_time": "2025-05-05T17:17:24+08:00",
        "authorisation_type": "FINAL_AUTH",
        "capture_method": "AUTOMATIC"
    }
}You can install the PayKKa Checkout UI npm package or embed it into HTML via CDN:
安装 @paykka/card-checkout-ui:
npm i @paykka/card-checkout-ui为了正常的展示组件,需要全局引入样式:
import '@paykka/card-checkout-ui/style.css'创建 PayKKaCheckout 实例时可传递参数及事件如下:
必填参数用 * 标识。
| 名称 | 说明 | 类型 |
|---|---|---|
| *sessionId | 收银台 ID,用来创建收银台。 | string |
| *clientKey | 客户端密钥。 | string |
| *env | 环境配置。
| |
| locale | 收银台文案展示语言。
| string |
| hidePaymentButton | 是否隐藏支付按钮,默认为 false。
| boolean |
| threeDSFrame | 3DS 配置对象,包含如下参数:
| ThreeDSFrameConfig |
| onPaymentMethodsReady | 收银台已经获取可用支付方式时触发。
| (methods: PaymentMethod[]) => void |
| onInitError | 收银台初始化异常时触发。
| (error: PayKKaError) => void |
| onSubmit | 提交表单时触发的全局事件。
| (formValidateError?: Record<string, FormValidateError[]>) => void |
| onSuccess | 支付成功后触发的全局事件。
| ({returnUrl?: string}) => void |
| onTimeout | 支付超时后触发的全局事件。
| () => void |
| onExpired | 会话过期或失效后触发的全局事件,或者支付成功后再次调起组件也会触发。
| () => void |
| onError | 支付失败后触发的全局事件。
| (error: PayKKaError) => void |
Here's a usage example:
import { PayKKaCheckout } from '@paykka/card-checkout-ui'
// 创建 PayKKaCheckout 实例
const paykkaCheckout = new PayKKaCheckout({
  sessionId: 'xxx',
  clientKey: 'xxx',
  env: 'eu',
  locale: 'en-GB',
  hidePaymentButton: false,
  threeDSFrame: {
    modalWidth: '350px',
    modalHeight: '500px',
  },
  onPaymentMethodsReady: (methods) => {
    console.log('支持的支付方式', methods)
  },
  onInitError: (error) => {
    console.log('初始化错误', error)
  },
  onSubmit: (formValidateError) => {
    console.log('提交表单全局事件', formValidateError)
  },
  onSuccess: ({ returnUrl }) => {
    console.log('支付成功全局事件', returnUrl)
  },
  onTimeout: () => {
    console.log('支付超时全局事件')
  },
  onExpired: () => {
    console.log('会话过期或失效全局事件')
  },
  onError: () => {
    console.log('支付失败全局事件')
  }
})Here is an example using the Card component:
Create a DOM element in your checkout page that will be used to render the Component.
<div id="card-container"></div>It is strongly recommended not to create this DOM element inside an iframe element, as this may prevent the checkout from functioning properly.
import { PayKKaCheckout,Card } from '@paykka/card-checkout-ui'

// Steps to create PayKKaCheckout instance omitted here

const checkoutCard = paykkaCheckout.create(Card,{
  // Card component constructor parameters
})const container = document.querySelector('#card-container')
checkoutCard.mount(container)If you are using JavaScript frameworks such as Angular, Vue, React, etc., please ensure that the DOM has been rendered before mounting, and do not re-render the element.
Query checkout status by checkout ID(session_id)
Request Example Query Session
{
  "merchant_id": "18356675194960",
  "trans_id": "m3246749195217",  # trans_id/session_id two choose one
  "session_id": "CS208760010022288125"
}
Response Example
{
  "ret_code": "000000",
  "ret_msg": "Success",
  "data": {
    "merchant_id": "18356675194960",
    "trans_id": "m3246749195217",
    "session_id": "CS208760010022288125",
    "session_mode": "DROP_IN",
    "status": "PROCESSING",
    "amount": "800",
    "currency": "HKD",
    "expire_time": "2025-05-05T17:17:24+08:00",
    "authorisation_type": "FINAL_AUTH",
    "capture_method": "AUTOMATIC"
  }
}Query transaction status by transaction ID(order_id)
Request Example Query Transaction
{
  "merchant_id": "18356675194960",
  "trans_id": "m3246749195217",    # session_id/order_id/trans_id three choose one
  "session_id": "CS208760010022288125",
  "order_id": "GW208760010022288125"
}
Response Example
{
  "ret_code": "000000",
  "ret_msg": "Success",
  "data": {
    "merchant_id": "18356675194960",
    "trans_id": "m3246749195217",
    "order_id": "GW208760010022288125",
    "session_id": "CS208760010022288125",
    "status": "SUCCESS", # Transaction status
    "error_code": "0000", # Transaction error code
    "error_description": "request success",
    "amount": "800",
    "currency": "HKD",
    "pay_finish_time": "2025-05-05T17:17:24+08:00"
  }
}If your payment requirements involve recurring charges from customers' bank cards or e-wallets at regular intervals (such as monthly, yearly, or custom time intervals) without requiring manual authorization each time, you can use PayKKa's recurring payment feature.
- Currently, PayKKa's recurring payment feature requires the merchant to initiate it periodically
- For the first recurring payment, PayKKa needs to store the card information of the cardholder, and subsequent recurring payments only need to provide the cardholder's token
- For subsequent recurring payments, only the cardholder's token needs to be provided, without repeating card information
First recurring request example Create Session
{
  "merchant_id": "18356675194960",
  "payment_type": "RECURRING",
  "authorisation_type": "FINAL_AUTH",
  "capture_method": "AUTOMATIC",
  "trans_id": "m3246749195217",
  "expire_time": "2025-05-05T17:17:24+08:00",
  "session_mode": "DROP_IN",
  "display_locale": "fr-FR",
  "currency": "HKD",
  "amount": "800",
  "return_url": "https://url",
  "mit": false,
  "payment": {
    "store_payment_method": true,
    "token_usage": "SUBSCRIPTION",
    "shopper_reference": "854f5baaf0a735139c583c4cea14d14c"
  },
  "goods": [
    // Product information
  ],
  "bill": {
    // Billing information
  },
  "shipping": {
    // Shipping information, required for physical goods
  },
  "customer": {
    // Consumer/customer information
  }
}
Subsequent recurring request example Initiate Transaction
{
  "merchant_id": "18356675194960",
  "payment_type": "RECURRING",
  "authorisation_type": "FINAL_AUTH",
  "capture_method": "AUTOMATIC",
  "trans_id": "m3246749195217",
  "currency": "HKD",
  "amount": "800",
  "mit": true,
  "recurring_agreement_id": "RA4264524535435435",
  "payment": {
    "payment_method": "BANKCARD",
    "shopper_reference": "558b5cb1b8cbcc8496062155c69cf2ab",
    "token": "TK20231435132143229"
  }
}The checkout product does not require you to handle 3DS authentication. PayKKa will automatically perform intelligent security detection and processing of payments. You only need to focus on the payment results.
The maximum validity period for the checkout is 24 hours. After expiration, payment cannot be continued. The Drop-in component will receive the callback event onExpired, and you can prompt the user that the payment has expired and guide the user to initiate payment again in this event.
If payment is not initiated before expiration, there will be no notification. Querying the checkout status will return status=EXPIRED, and querying the transaction status will return ret_msg=the order doesn't exist
Reference Webhook